
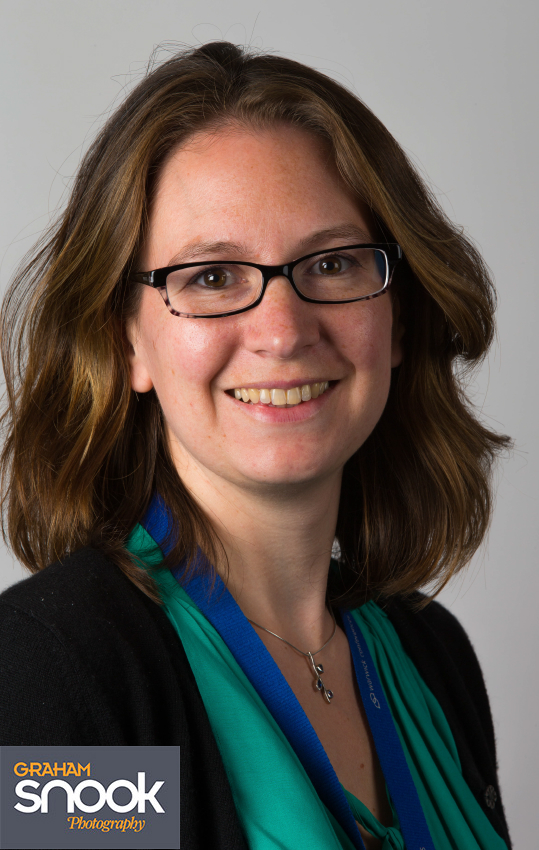
This Amel 55 looks yellow, but actually, she was white. It’s all down to the colour of light. Back in the days of film we photographers had a choice of two types of transparency film for different light sources: daylight and tungsten. You shot daylight outside. Inside, under burning bits of wire cocooned in glass, you shot tungsten. It was possible to buy filters to go over lights or lenses, to correct the image for the lighting and film stock you were shooting on. But basically, it boiled down to one or the other. If you shot daylight film under tungsten lights your images would end up orange. If you shot tungsten film in daylight you’d end up with blue-tinted images. If you shot on colour negative it was possible to correct the colour bias of the lights the image was shot under, but magazines use transparencies. I used to work in the darkroom of Allsport, which was bought by Getty Images. One of my jobs was to colour correct negatives onto duplicating film, which was also negative. Two negatives make a positive and the result was an image like you’d find on slide film.
This process was done using a colour analyser, a machine with four dials, four digital readouts, and a screen. Place the negative in it, and a positive image would appear on the screen, adjust the dials to colour correct the image and its exposure. Copy the values on the digital displays onto the sheet with the negative in, move onto the next one. Then do a test shot with the high-speed duplicating machine, process the images, then correct them by eye before duplicating that image up to 144 times. This was in a time before images were digital, a time when Allsports clients would receive budging envelops of ‘dupes’ from the weekend sports action on a Tuesday morning. Papers would get scans, magazines used dupes. Every premiership football game would produce between 10-20 images which all needed duping, so I like to think I know a little bit about colour correction.
Film never adapts to different light source, but our eyes do. Don’t believe me? Try this: Click on the picture below and follow these instructions – it will work best on a computer monitor:
Maximise this window to full screen.
Close one eye.
Move your head about 30cm from your screen.
Stare at the magenta screen for slow count of 10.
Now look somewhere else in the room (preferably at something you know is white) keeping your one eye closed.
Now quickly open your closed eye and close your open eye.
Then flick between your eyes opening and closing your alternate eyes

What you should see is the colour from one eye (the one you left open) should have a green colour bias, and your closed eye will appear to have neutral colours. Don’t worry your eyes will revert to the way they should be, there’s no lasting damage. What your brain is doing (in a round about way) is thinking “this is too magenta, I’ll try to make it white” and correct your vision by reducing the amount of magenta information it’s taking in and increasing amount of information from the green cones. It works well in a speedy fashion as you can see.
This is great for our eyes but with film if you shoot using candle light, you get an orange cast, shoot under florescent light and your images come out green. But what now in the world of digital?
Digital cameras are more like our eyes than film in this respect, it’s possible to make almost any light appear white by using the correct white balance. But before I tell you what to do and how to do it, first you have to understand a bit about light. So pay attention at the back, it’s a quick physics lesson.
Light is part of the electromagnetic spectrum, this is light when it travels in waves. The electromagnetic spectrum encompasses all sorts of radiation, from radio waves, X Rays and microwaves. The spectrum is vast, from tiny Gamma radiation waves with a wavelength 1 trillionth of a meter long to Extra Low Frequency waves with a wavelength 1 billion meters long. Or to put that another way, if you start off at the peak of one wave, you would have to go around the equator around 25 times before you get to the next peak. But we’re not interested in all of it, just the bits between infrared and ultraviolet, or the visible light spectrum. These are the bit of light we can see with our eyes and that the camera will capture.
White light is made up from all the colours in the visible light spectrum. Did you ever, as a child, get the circular piece of rainbow-coloured card, stick a pencil in the middle and spin it. What happened to all the colours as the disc span? That’s right it turned white. All light sources are transmitting visible electromagnetic radiation over the visible light spectrum. But not all of them are producing equal amounts of all the colours. Remember Tungsten lights look orange with daylight film? No prizes for guessing which colour dominates the tone, or hue, of the white light they transmit. So we have to do the work our brain is doing, adjusting the hue and correct for it. So in this case reducing the amount of green information and increasing the amount of magenta which is captured. So how do we do this?
Again before I tell you, it’s back to the physics class. You might have read or heard me, or other photographers, talking about a warm light. This is a light that has a warm hue, think reds, oranges and yellows, warm colours. Cold light has more blues and cyan colder colour in it. The colour bias of white light is knows as its temperature, measured in Kelvin, or K. BUT, and you’ll see that’s a big “but”, it’s more about the warm fuzzy feeling of warmth we get from the light, not it’s colour temperature. Because a warm light has a colder colour temperature than a cold light. A match, candle or campfire burns with a very warm coloured light, but the colour temperature is around 1,700K. Sunset around 1,800K . Light bulbs are around 3,000K. Mid-day sunlight is around 5,000K, Flash is about 5,500. An overcast day and the colour temperature will be around 6,500K.
So how do I know what temperature to use? Take a look at this, it’s the same image processed nine different ways:
As you can see all of them are different, some more than others, but which one is right? There are five simple ways to get a usable white balance, six if you guess the colour temperature! Four are free if you have a digital camera, the other will cost you money. The expensive way is to buy yourself a colour meter, which although it looks like a light meter measures the colour of light and gives you a colour temperature reading in Kelvin. But rather than spend money you could leave your camera in AWB. In Auto White Balance the camera measures the ambient light colour and corrects for it. Most of the time it works well, however as with everything automatic, it’s not 100% reliable.
Next, you could start to tell the camera what mode to shoot in. Most cameras have white balance settings for sunny day, shadow, tungsten and florescent, set this to the lighting you’re shooting under and everything will go in your favour – just don’t forget to change the setting when you change locations.
The third free way is to shoot in RAW. Put simply when you shoot an image, the camera takes that information and converts it into a jpg image. However, most digital cameras have the ability to shoot in RAW. If you shoot RAW, the camera takes that information and saves it unchanged and uncompressed. You then use a computer and software to convert that into an image. The advantage of doing this is that you can correct errors with exposure, sharpness or white balance at a later time, get a greater depth of colours and the ability to bring more detail from an image. Shooting RAW is another topic I’ll be covering in the future, it’s a complex one, so I’m still plucking up the courage to tackle it.
The last way is possibly one of the handiest. It’s taking a Custom White Balance. This involves placing something white in your scene and taking a photograph, then you set the custom white balance. This involves using the image of the white object/surface and setting the camera to tell it that it’s white. This usually means setting the camera in Program mode and taking a photograph of something you’d like to appear white, and then assigning that to the custom white balance. and setting your camera to the custom white balance setting.
If you go back to just after the video, you’ll notice I said “usable” white balance. Because even if your white balance setting is slightly out, it’s still possible to correct it.
So why would you need to use a custom white balance? Often, in overcast conditions, I found that the Auto WB, would make images too cold, or in sunset conditions the camera would rob the images of warmth.
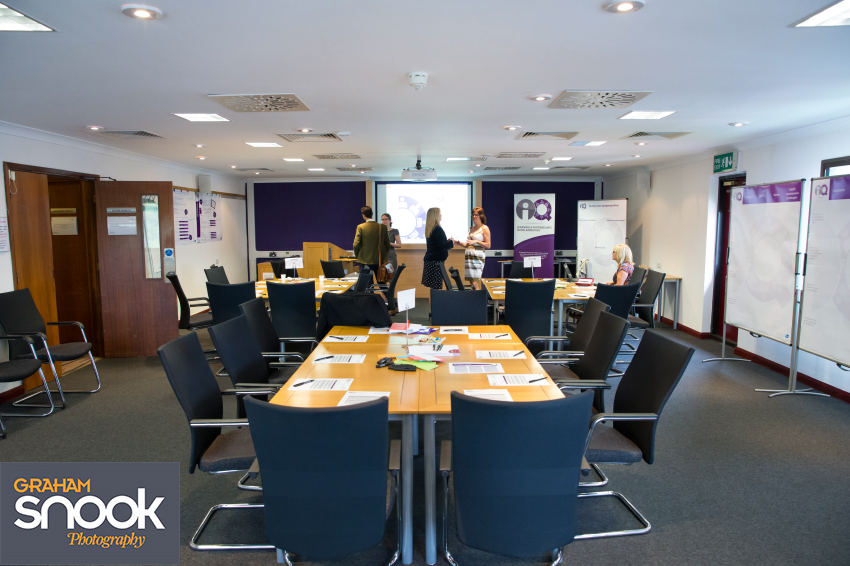
I recently shot a conference for a client. As well as the images from conference, the client also wanted studio portraits of 20 delegates with studio lighting and a plain backdrop. Studio flash has one colour temperature, the room where the conference was taking place was under a mixture of tungsten, florescent and daylight, so had a very different colour temperature.
Studio flash has a colour temperature of around 5,500K, but the light from the flash can reflect from the walls taking on the colour of the walls. Luckily the walls were a neutral colour, but because the backdrop was white, I was able to do a simple custom white balance on it to make sure it was as accurate as possible. This was saved in-camera.
Next was the room where the conference was, again a custom white balance was the way forward. But it wasn’t as simple as that, because fluorescent lights, like all 240v ac light, are actually switching on and off 50 times a second. But the curious thing about florescent light is that the colour temperature of the light it emits, changes over the cycle of switching on and off. So if I were to use a shutter speed faster than 1/50th of a second the colour balance of the images would change. Go to 1/250th (if your ISO will let you go up that high) and almost every shot will have a different colour balance, but come down to 1/60 and the images will be very similar.
In one room I had one colour balance, and the other was totally different. As a back up I also shot RAW to enable me to adjust any discrepancies with colour balance over the day. Unfortunately, I’m unable to show shots of the event, but I can show the test shots (above and below).
Here was part of the room where the conference was taking place. As you can see there are a number of different light sources and the custom white balance has served me well.
Keep in touch with regular updates with LinkedIn on Graham Snook Photography’s company page