

Take a look at the image above image, it’s a reject from a recent shoot of the Princess 52 for Motor Boats Monthly and Motor Boat and Yachting. Not a great shot, but there is one uncorrectable error with it, and it’s not the seagull. Have a look at it at 100% and see if you can see what it is:

Yep, that’s right Both Nick and Jack on the helm are out-of-focus, as is much of the 52 ft boat. I have, however, managed to get the bow and spray in the foreground pin sharp though! I released the shutter too early -before the boat came into focus, or I allowed the camera to focus on the spray and not the boat. Either way, it’s my fault, not the camera’s.
The focus of today’s Tuesday tip is focus. Do you see what I’ve done there? Focus and focus. Nevermind. What is it about focusing that can be fraught with difficulty? It annoys me to see out-of-focus images printed, not my images of course, because any out-of-focus images I take are culled at the first opportunity. In fact, for this Tuesday tip, I’ve had to hunt around for an out-of-focus image to demonstrate with, as I usually banished them as soon as I find them. Yes, some of the images I take can be out-of-focus as you can see, it happens to everyone, even professionals. But what is an out-of-focus image?
An image is said to be in-focus when the bit you want to be in focus is in-focus. That wasn’t very helpful, I know, but as always you’ll have to bear with me. Now, what do I mean by focus? The easiest way to demonstrate this is to close one eye and look at your computer screen. Keep looking at your computer screen then place your index finger at eye level between your eye and the screen about 15 cm/6 inches or the diameter of a CD away. If you keep looking at the screen, that will be in-focus, you can read this text, but the edge of your finger is soft and blurry and out-of-focus. So if the edges and lines making up the subject are all distinct and sharp it’s “in-focus”. This can be achieved optically, but also different lighting situations can make images appear sharper. If you go back to last week’s tip The hard light of day about hard and soft light you’ll see hard light, like flash, has a distinct line between light and dark caused and this can make images appear sharper. But no matter how hard the light is, if an image is out-of-focus (OOF) it will still be softer than a fairy-tale princess’s mattress and there is little man nor beast can do, except print it small, use it at web resolution or send it to the trash. As you can see from the top picture, using an image small can cover up the image’s softness. One of the reasons, when designing this website, I wanted big images was to show my images in their full glory with nothing to hide behind. Put simply, I take pride in the quality in my work.
So what makes an image “in-focus”? The simple answer is: you do. But I’m guessing that wasn’t the answer you’re after.
If you’re finding this a bit much, you’ll love the next bit. It’s all down to the aptly named “circles of confusion”. The lens focuses part of the image on the film or sensor, this is the plane of focus, or focal plane. When part of the image is in-focus, the circles of confusion at this point are tiny. Think of the middle of a sand egg timer, or if you’re into boating the top mark of a west cardinal mark, (yes, the one with a waist). It starts with an inverted cone, narrows to a point and then expands into another cone. Turn this on its side, and this is what light is doing in your camera.
Where the image is in-focus, is where the light narrows to a point. Move the image (or sensor) forwards or backwards in the camera and a different part of the image will be in-focus, but where the image was previously in-focus the circles – diameter of the cones – making up the image have increased in size making the image less sharp, as have all the others making up the parts of the image. Likewise, if you can manually focus the lens, turning the focus ring one way or another will adjust where in space the light narrows to a point, the part of the image in-focus.
So as a photographer, ideally you want to the subject in the picture to be in-focus. The easiest way to achieve that is to shoot with a small aperture (to increase the depth of field) and a wide-angle lens. However, this makes everything in-focus, a machine gun, spray-and-pray, approach. When really you should be thinking sniper. Using the focus to lose extraneous details or emphasise important one is a powerful visual device and one that makes great photos.
The majority of digital cameras nowadays work in the same way if you are shooting in auto-focus, switch the camera on (always a good starting point), press the shutter half way down to tell the camera to focus, push the shutter all the way down to take the photograph. Simples! What can go wrong? How much time have you got?! Wherever there’s an image, there’s the ability to get the focus wrong.
Some cameras have facial recognition, others have servo assist, it’s impossible for me to know what sort of camera you’re using, and even if I did, the manual of my Canon 1DX runs at 47 pages just devoted to the focus modes, and I don’t have that much time!
So, let’s start with the basics, most of the time (usual caveat: cameras have different settings and work differently, but these are general rules and it’s up to you to read your camera manual) the camera will use a central focussing point. So whatever you point the centre of the frame at, press the shutter button halfway and the camera should focus on it. Generally, it works well, but there are a number of situations when it won’t.
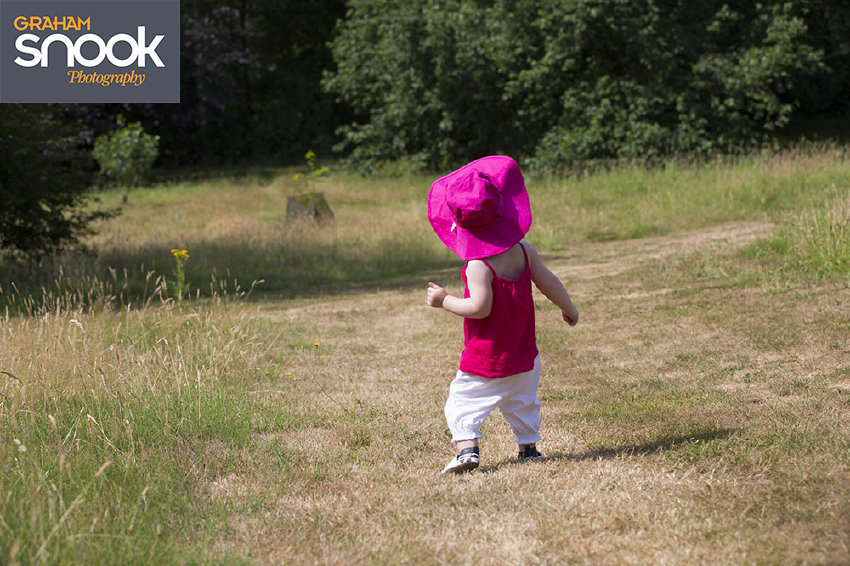
Put the subject in the centre, focus and shoot. The subject, my daughter above, is in-focus but it’s not the most inspiring of images. The subject is in the middle of the frame with lots of space around them and there isn’t much distinction between the subject and the background except for the use of colour.
You see, for the camera to focus accurately it needs two things, enough light to see what’s going on, and contrast where you want it to focus. Without enough light or contrast, you’ll find the camera will hunt: try to focus, then go from one focal extreme to the other while it’s looking for something to focus on. A lot of cameras have a red/orange AF assist light, which shines a pattern of light that gives the camera the contrast it needs to focus in low light. But even with light and contrast you need to do more to improve your images.
If the camera does start hunting you need to know what you can do to help it out. The first solution: If you have manual focus, now would be a good time to use it. Not all cameras have manual focus, or if they do it can be a faff to get to easily, so you can help the autofocus out.
If what you’re photographing is all one tone or colour with little texture, think the sail of a yacht, then you have to aim the camera at something the same distance away with contrast, so either the edge of the sail, the shrouds or spreaders or sail numbers. Or if you’re photographing a wall, stick someone in front of it, focus (pressing the shutter down halfway), and get them to move while you still hold the shutter button halfway down, before shooting.
If you’re photographing something reflective, the camera will often focus on a reflection in the subject rather than the subject itself. Again you have to find something at the same distance, or something of contrast on the subject and point the camera at that, focus, and then shoot.
But it’s not always the “fault” of the camera. As always, you are the photographer, you’re in charge, and the buck stops with you!
Get two people together, focus and shoot and, much like the “quality” of BBC news coverage, you’ll end up with a blurry figure and a sharp background. (I’m so glad I bought a big HD TV). So what you have to do in this situation is move the centre of the frame to cover one of the two people, press the shutter halfway, and allow the camera to focus. And with your finger still, halfway down, recompose the image, then press the shutter button down fully. What you’re doing is locking the focus onto the subject and by keeping the shutter button halfway down you’re telling the camera you don’t want it to refocus. This is also great to move your subject off centre, improving the compositional elements, making an image more visually stimulating, or simply showing more of a vista behind a friend or family member.
Once you can photograph static objects, then it’s time to move on to moving objects, but we’ll save that for another day.